Picture Rail: Purpose, Cost, DIY Installation & Dado Rail
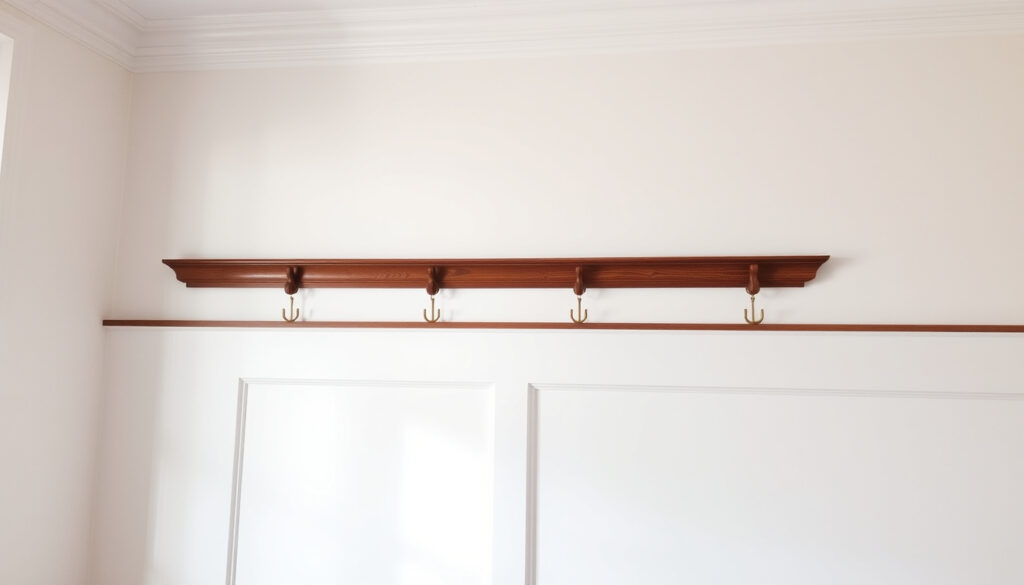
Anyone who has tried to hang art in a rental knows the small dread of pushing a nail into plaster. Picture rails were designed to remove that anxiety: a slim horizontal ledge fixed near the ceiling, from which pictures are hung with hooks and wire.
The idea dates back to the 1600s, when European interiors used it to display tapestries, and it is now enjoying a quiet revival in modern flats. Here’s how to tell whether a picture rail is worth the effort — and how to install one without calling in a carpenter.
Originated in the 1600s: used for hanging tapestries in period homes ·
Typical placement: near the ceiling, 6–12 inches down ·
Common material: moisture-resistant MDF ·
Key benefit: display artwork without wall damage
Quick snapshot
- A picture rail allows artwork display without wall holes (Skirting World (UK moulding retailer))
- Typical placement is roughly 30–50 cm below the ceiling (DIYdata (UK DIY reference site))
- Retail prices are not directly comparable without checking length, material, profile, primer, VAT treatment, and stock date (Central Skirting (UK skirting supplier))
- No reliable figure exists for how many modern homes now install picture rails (Evening Ledger (home-improvement blog) general trend analysis)
- Originated in the 1600s for tapestries; revived in the 2020s for rental-friendly decor (The Craftsman Blog (preservation-focused blog))
- Victorian and Edwardian homes adopted the rail for framed art in the 19th century (The Craftsman Blog (preservation-focused blog))
- Expect more no-damage wall display systems aimed at renters and listed buildings (Skirting World (UK moulding retailer) notes increasing interest)
- Search interest now pairs picture rail with both dado rail comparisons and DIY installation guides (DIYdata (UK DIY reference site) illustrates common comparisons)
Seven quick facts, one pattern: picture rails are a fixed moulding that makes wall art movable.
| Fact | Value |
|---|---|
| First used | 1600s |
| Typical height from ceiling | 6–12 inches (15–30 cm) below the ceiling in most UK guides |
| Common width | 2–4 inches |
| Primary material | MDF, wood, polyurethane |
| Fixing method | Adhesive plus nails, or screws with wall plugs |
| Fixing intervals | Roughly 15 cm to 500 mm, depending on profile and substrate |
| Main alternative | Dado rail, fitted at waist height for wall protection |
What Is the Point of a Picture Rail?
Purpose of a picture rail
- Hang artwork without drilling into plaster
- Move hooks along the rail whenever the display changes
- Keep period walls and paintwork free of repeated holes
A picture rail is a slim horizontal moulding fixed high on the wall. Pictures hang from it on hooks and wire, which means the plaster itself never takes a nail. Skirting World (UK moulding retailer) describes the benefit simply: artwork display without wall holes.
That one difference changes how a room behaves. A gallery wall stops being a permanent commitment and starts being a layout you can tweak in minutes.
For renters, a picture rail turns a plaster wall into a display system — no filler, no repainting, no deposit dispute.
Historical origins
- 1600s: picture rails appear in European homes as hangers for tapestries (The Craftsman Blog (preservation-focused blog))
- 19th century: Victorian and Edwardian interiors adopt the rail for framed paintings (The Craftsman Blog (preservation-focused blog))
- Mid-20th century: the rail fades as smooth walls and modern adhesives arrive (The Craftsman Blog (preservation-focused blog))
- 2020s–2026: a revival driven by rental-friendly decor and interest in period features (The Craftsman Blog (preservation-focused blog))
The 1600s date is the one most design histories repeat: the rail began as hardware for hanging tapestries in grand European rooms. The Craftsman Blog (a preservation-focused building blog) describes the rail’s historical role in exactly those terms — a way to hang artwork without putting hooks or nails directly into plaster.
Modern benefits
- No wall damage — the rail takes the load, not the plaster
- Art can be re-arranged in seconds with sliding hooks
- Works in period homes and modern flats alike
The modern version is usually simpler than the Victorian original: a slim painted line near the ceiling, doing the same job with wire and hooks. It suits homes where the walls are plaster, the ceiling is tall, or the landlord is watching.
In rooms with high ceilings the rail sits lower, and in low-ceiling flats it sits closer to the cornice — placement is a judgment call, not a rule.
Picture Rail vs Dado Rail: What’s the Difference?
Differences in height and function
- Picture rail: mounted near the ceiling, designed for hanging art
- Dado rail: mounted at waist height, designed to protect walls and divide colour
- They solve different problems — one is a hanging system, the other is a wall treatment
The two mouldings are often confused because both run horizontally across a wall. Evening Ledger (home-improvement blog) defines the dado rail as a horizontal decorative or protective division rather than an artwork-hanging system.
A dado rail is generally used as a horizontal decorative or protective division on a wall rather than primarily as an artwork-hanging system.
— Evening Ledger (home-improvement blog)
Four contrasts, one pattern: picture rails work with what hangs on the wall, dado rails work with how the wall itself looks.
| Feature | Picture rail | Dado rail |
|---|---|---|
| Placement | Near the ceiling, 15–50 cm below it | Waist height |
| Primary job | Hanging artwork without wall damage | Protecting the lower wall and dividing wall colours |
| Typical rooms | Period homes, galleries, rental flats | Hallways, dining rooms, panelled living spaces |
| Can they be combined? | Yes — they occupy different bands of the wall and do not compete | |
Typical uses of each
- A dado rail carries no weight — it is a visual break
- A picture rail is load-bearing for frames, mirrors, and lightweight textiles
Panelling Direct (UK panelling retailer) links dado rails to colour blocking, wall panelling, and visual separation between upper and lower wall treatments. That is a decorative job, which is why a dado rail usually stays bare while a picture rail is expected to hold something.
Can they be used together?
Yes. A picture rail above and a dado rail below occupy different bands of the wall, so they can share a room without fighting.
The division of labour is clean: the dado rail handles wear and visual rhythm at eye level; the picture rail handles whatever hangs above. That is why the two are best treated as complementary, not competing, mouldings.
How Much Does Picture Rail Cost?
Cost per linear foot
Dado rail from: £7.66 ex VAT (Central Skirting (UK skirting supplier)) ·
Pine astragal 2.4 m: £16.37 (Panelling Direct (UK panelling retailer)) ·
Primed 2.4 m: £31.19–£35.99 (Panelling Direct (UK panelling retailer)) ·
Unprimed MDF per metre: €3–€8 estimate (Evening Ledger (home-improvement blog))
One honest caveat: almost all published prices are for dado rails, because that is the moulding retailers list. The buying logic for picture rail is identical — length, material, profile, and finish drive the number.
Listed prices are not directly comparable without checking length, material, profile, primer, VAT treatment, and stock date.
— Central Skirting (UK skirting supplier)
Material and labour costs
- MDF is the budget option; solid timber is the premium route
- Primed or rebated profiles cost more than unprimed stock
- Professional installation adds the biggest single cost
According to a secondary guide, unprimed MDF dado rail runs to roughly €3–€8 per metre and primed lengths to about €8–€25 each depending on profile complexity (Evening Ledger (home-improvement blog)). The guide labels these as UK retailer pricing but quotes them in euros, so treat the figures as a rough band rather than a quote.
DIY vs professional installation
- DIY removes the labour line entirely
- Professional fitting adds the largest variable cost
- Rooms with bay windows, uneven ceilings, or multiple corners push work toward a pro
The material is the small part of the bill; the decision that matters is whether your walls and ceilings are straight enough for a first-time fit to look clean. External corners and coving raise the cutting complexity quickly.
The price list tells you what the wood costs, not what the finished job costs. Check VAT and priming before comparing products.
The trade-off: you can spend under £10 on a run of rail and fit it yourself, or pay for premium timber and a professional fit. The rail itself is rarely the budget breaker — labour and preparation are.
How to Make a DIY Picture Rail?
Materials needed
- Picture rail moulding — MDF for budget, timber for period feel
- Spirit level, tape measure, pencil, mitre saw or mitre box
- Adhesive plus nails, or wall plugs and screws for hollow walls
- Filler, sandpaper, and paint for the finish
The mechanically fixed route uses drilling, wall plugs, screws, filler, sanding, and painting — the sequence described in DIYdata (UK DIY reference site). The adhesive-and-nails route is faster and works on sound plaster.
Step-by-step installation
- Measure the wall run and buy roughly 10% extra for cuts
- Mark a continuous level line before fixing anything
DIYdata (UK DIY reference site) recommends marking a continuous level line before cutting and fixing, then positioning fixings about 30 cm from each corner and no more than 1 m apart.
- Decide the height: roughly 15–50 cm below the ceiling, depending on the room.
- Draw the level line around the room.
- Cut the moulding to length, mitring corners where the rail turns.
- Fix the rail with adhesive plus nails at roughly 500 mm intervals (Skirting World (UK moulding retailer)), or with construction adhesive and pneumatic nails at roughly 15 cm intervals (HGTV (home improvement network)).
- Keep fixings about 30 cm from each corner and no more than 1 m apart.
- Fill, sand, and paint.
The required spacing depends on the rail profile, substrate, fastener type, and installation standard.
— HGTV (home improvement network)
The two guides disagree on spacing — 15 cm vs 500 mm — because the right interval depends on your wall and your fixing method. Follow the method you chose, not a random number from a forum.
Finishing and painting
- Fill nail heads and mitre gaps before painting
- Prime bare MDF or timber so the topcoat doesn’t soak in unevenly
- Paint the rail the same colour as the wall, or a contrasting colour for a deliberate line
Paint is what makes the rail look intentional. A rail painted to match the wall reads as a subtle detail; a darker rail draws the eye up and frames the wall.
The pattern across every DIY guide: measure twice, fix level, paint once. Any method that follows those three rules will hold art for decades.
Is a Picture Rail Old Fashioned?
Current design trends
- Period features are back, picture rails included
- Rental-friendly decor favours anything that avoids drilling
- Modern styling uses the rail as a gallery system, not a frill
The short answer is no. The 2020s version of the picture rail is usually simpler than the Victorian original: a slim painted line near the ceiling, used to hang a changing collection of prints, mirrors, and textiles.
Why picture rails are returning
A few metres of moulding turns any wall into a gallery — the same promise that made the rail popular in the 1800s now works in flats with plasterboard.
Three forces line up: the taste for period character, the rise of no-damage rental decor, and the simple fact that a rail is a small purchase compared with a shelving system. It also makes a room feel settled — art stops being a nail-position decision and becomes a styling decision.
Styling with picture rails
- Hang frames at staggered heights with picture wire
- Use the rail for lightweight mirrors and small textiles
- Pair it with a dado rail below for a full period look
Styling is where the rail earns its keep. Hooks slide along the rail, so you can rebalance a wall in minutes and swap in new prints whenever the mood changes. That flexibility is the whole point of the system, and it is the reason the rail keeps returning.
Upsides
- No wall damage — art hangs from the rail, not the plaster
- Quick to rearrange: hooks slide, frames move in seconds
- Adds a period detail that suits modern and traditional rooms
Downsides
- Adds a horizontal line that can make a low ceiling feel lower
- Frames can swing if the hook slides while you adjust them
- A visibly uneven rail always looks worse than no rail
What’s confirmed, what’s unclear
The certain facts are the old ones; the uncertain facts are the current ones — pricing and trend data move faster than the moulding itself.
Confirmed facts
- Picture rails date back to the 1600s (The Craftsman Blog (preservation-focused blog))
- The best-documented modern use is damage-free art display in plaster-walled homes (Skirting World (UK moulding retailer))
What’s unclear
- Current per-metre picture-rail pricing — published figures mostly cover dado rails (Evening Ledger (home-improvement blog))
- The share of modern homes using picture rails — no reliable figure exists (Evening Ledger (home-improvement blog))
- Evening Ledger’s euro-labelled UK price estimates are rough, not verified (Evening Ledger (home-improvement blog))
- Whether the revival continues after 2026 or plateaus
What Materials Are Picture Rails Made From?
MDF
- Most common and most affordable option
- Primed MDF resists moisture when painted
- Easy to cut and fill for DIY work
MDF is the default picture-rail material. It cuts cleanly, paints well, and keeps the project cheap; moisture-resistant MDF is the sensible choice for kitchens or bathrooms.
Solid wood
- Traditional look that matches period joinery
- More expensive than MDF, needs priming and finishing
- Hardwoods give a crisper profile but cost more
Wood is the rail you choose when the house already has timber skirting and architraves. It takes paint well and can be stripped back and refreshed; the trade-off is price and a bit more prep.
Polyurethane
- Lightweight and easy to cut with a fine-tooth saw
- Won’t rot or swell in humid rooms
- Common for bathrooms and coastal properties
Polyurethane (often called polymer) rails are the practical choice for damp spaces where MDF might swell and timber might move. They are also light enough for strong adhesive to hold without nails on sound plaster.
Three materials, one pattern: cost and moisture resistance move in opposite directions to how traditional the profile looks.
| Material | Cost | Moisture resistance | Best for |
|---|---|---|---|
| Raw MDF | Lowest | Good when primed | Budget DIY and painted finishes |
| Primed MDF | Low to mid | Better once painted | Faster painted projects |
| Pine | Mid | Needs sealing | Period-style painted rooms |
| Oak or hardwood | High | Stable once sealed | Stained or clear-finished rails |
| Polyurethane | Mid | High — won’t swell or rot | Bathrooms, kitchens, coastal spots |
| Primed timber | Mid to high | Needs sealing | Period homes where the finish matters |
The trade-off: MDF wins on budget, wood wins on authenticity, polyurethane wins on moisture. Choose the room first, then the material.
The picture rail is having a second life because it solves a modern problem with a 400-year-old trick: hang the art from the wall, not in the wall. For UK renters and flat owners, the implication is clear — put up a rail and hang what you like, or keep patching holes and repainting at every tenancy move.
Frequently asked questions
Do picture rails damage walls?
No, if installed properly. The rail is fixed to the wall once, and artwork hangs from the rail on hooks and wire, so frames never put a nail into the plaster.
Can you install picture rail on drywall?
Yes. Use construction adhesive plus nails at roughly 15 cm intervals, or adhesive with nails at about 500 mm intervals if you follow the Skirting World approach. Screws and wall plugs also work on drywall.
How high should a picture rail be?
Most guides suggest roughly 15–50 cm below the ceiling; the distance increases in rooms with taller ceilings.
What hooks are used for picture rail?
Purpose-made picture-rail hooks sit over the top edge of the rail. Frames then hang on wire or cord from the hook, which gives you the freedom to raise or lower each frame.
Can picture rail be painted?
Yes. Fill nail heads and mitre joints, sand, prime bare MDF or timber, then paint the rail to match the wall or contrast with it.
Is picture rail expensive to install professionally?
Material is the modest part; labour is the main cost. Retailers stress comparing like-for-like on length, profile, primer, and VAT before judging any price.
What is the best wood for picture rail?
Primed MDF is the budget-friendly default in most homes; solid timber suits period properties; polyurethane is the moisture-resistant choice for bathrooms and coastal rooms.
More related posts
 Ford Transit Buying Guide: Reliability & Model Years
 Gwen Stefani: Biography, Age, Children, Husband, and More
 Eddie Kadi: Bio, Career, Net Worth & Strictly Come Dancing
 Claudia Winkleman: Biography, Career, and Signature Look
 Ella Maisy Purvis: Biography and Neurodiversity
 NHS Dentists Near Me – Find Practices Accepting New Patients
 Tamsin Egerton: Her Life, Career, and Family with Josh Hartnett
 Lisa Tarbuck: Why She Left BBC Radio 2, Beard & Net Worth